


When you turn on your computer, it goes through a series of checks to ensure everything is working correctly. One crucial part of this process is the Power-On Self-Test (POST).
To fix a VGA light on the motherboard, reseat the graphics card, check power connections, update BIOS, ensure proper cable connections, test with another monitor or GPU, and update drivers.
This article will guide you through the steps to fix a VGA light on your motherboard in simple, easy-to-follow language.
Understanding the VGA Light:
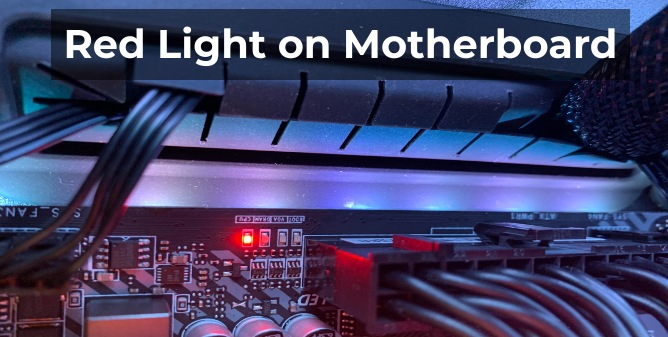
Before we dive into the troubleshooting steps, it’s important to understand what the VGA light indicates. VGA (Video Graphics Array) refers to the video output component of your computer. This light is a diagnostic tool built into many modern motherboards to help users identify issues with their systems.


When the VGA light on your motherboard is lit, it typically signals that the motherboard is experiencing difficulties in communicating with the graphics card. This communication breakdown can prevent your computer from displaying anything on the monitor, effectively rendering your system unusable until the issue is resolved.
Common Causes of a Lit VGA Light on the Motherboard:
The lit VGA light can stem from several underlying problems. It might indicate that the graphics card is not properly seated in its slot or that it is not receiving adequate power. Additionally, it could point to issues with the video output connections, such as a loose or faulty cable connecting the monitor to the graphics card.

:max_bytes(150000):strip_icc()/001_meaning-of-red-light-on-motherboard-5189456-f5976c1aad31470797846202dbdcf2da.jpg)
The problem might also be rooted in the BIOS/UEFI settings, where incorrect configurations can disrupt the communication between the motherboard and the graphics card. In some cases, the graphics card itself could be defective, or there might be an issue with the motherboard’s PCIe slot. Understanding these potential causes is crucial as it guides the troubleshooting process to identify and fix the problem effectively.
- Power Issues: The graphics card may not be getting enough power.
- Faulty Graphics Card: The graphics card itself could be defective.
- Monitor or Cable Problems: The problem could also be with the monitor or the cable connecting it to the graphics card.
- BIOS/UEFI Settings: Incorrect settings in the BIOS/UEFI can cause VGA errors.
- Driver Issues: Outdated or corrupt drivers can lead to communication problems between the motherboard and the graphics card.
- Motherboard Issues: In rare cases, the motherboard itself might be defective.
Step-by-Step Guide to Fixing the VGA Light Error:

Step 1: Power Off and Unplug:
Before you start working on your computer, make sure it is completely powered off. Unplug the power cable from the back of the computer to ensure there is no power running through the system. This is a crucial safety step to prevent electric shocks or damage to your components.
Step 2: Check the Graphics Card:
Remove the Side Panel: Open your computer case by removing the side panel. This usually involves unscrewing a few screws or releasing some clips.

- Inspect the Graphics Card: Look at your graphics card. Ensure it is properly seated in the PCIe slot. If it appears loose, gently push it back into place until it clicks.
- Remove and Reseat the Card: If the card looks fine but the VGA light is still on, try removing it completely and then reseating it. To do this, carefully unscrew and remove the card from the PCIe slot, then reinsert it firmly.
- Secure the Card: Make sure the card is secured with screws or clips to prevent it from moving out of place.
Step 3: Check Power Connections:
- Power Cables: Ensure that all power cables connected to the graphics card are securely plugged in. Some high-end graphics cards require additional power connectors, usually 6-pin or 8-pin connectors. Make sure these are firmly attached.
- Power Supply: Verify that your power supply is adequate for your graphics card. Check the wattage rating of your power supply and compare it to the requirements of your graphics card.
Step 4: Inspect the Monitor and Cables:
- Cable Connections: Ensure that the video cable (HDMI, DisplayPort, DVI, or VGA) is securely connected to both the graphics card and the monitor.
- Check for Damage: Inspect the cable for any visible damage. If you suspect the cable might be faulty, try using a different cable.
- Monitor Settings: Make sure the monitor is set to the correct input source. Use the monitor’s menu to select the input that matches the connected cable.


Step 5: Test with a Different Monitor or Cable:
To rule out issues with your monitor or cable, try connecting your computer to a different monitor using a different cable. If the VGA light turns off and the display works, the issue might be with your original monitor or cable.
Step 6: Reset BIOS/UEFI Settings:
- Enter BIOS/UEFI: Power on your computer and press the key to enter BIOS/UEFI (usually Del, F2, or Esc).
- Load Default Settings: Look for an option to load default or optimized settings. This is usually found under an option like “Load Defaults” or “Load Optimized Defaults”.
- Save and Exit: Save the changes and exit BIOS/UEFI. Your computer will restart with the default settings.
Step 7: Update or Rollback Graphics Drivers:

- Safe Mode: Boot your computer into Safe Mode. This can be done by pressing F8 during startup or through the Windows settings if you are using Windows 10 or later.
- Device Manager: Once in Safe Mode, open Device Manager (you can search for it in the Start menu).
- Update Drivers: Find your graphics card under “Display Adapters”, right-click it, and select “Update Driver”. Follow the prompts to search for updated drivers.
- Rollback Drivers: If the issue started after a recent driver update, you can also try rolling back to a previous driver version. Right-click the graphics card in Device Manager, select “Properties”, go to the “Driver” tab, and choose “Roll Back Driver”.
Step 8: Test the Graphics Card in Another System:
To rule out a defective graphics card, try testing it in another computer that is known to be working. If the card works fine in the other system, the issue might be with your motherboard or other components in your original setup.
Step 9: Test with a Different Graphics Card:

Similarly, you can test your system with a different graphics card. Borrow a known working card from a friend or use an older spare card if you have one. If the VGA light goes off and the display works with the other card, your original graphics card may be faulty.
Step 10: Check for Motherboard Issues:
- Inspect the PCIe Slot: Look for any visible damage or debris in the PCIe slot where the graphics card sits. Clean it carefully with compressed air if necessary.
- Check for Other Errors: Ensure there are no other error lights or beeps indicating issues with other components like RAM or CPU.
- Contact Support: If you suspect a motherboard defect, contact the manufacturer’s support for further assistance or consider taking your computer to a professional technician.
Step 11: Replace Faulty Components:


If you’ve identified a faulty component (graphics card, cable, monitor, or motherboard), the final step is to replace it. Purchase a compatible replacement and install it according to the manufacturer’s instructions. Always handle components with care and ensure proper grounding to avoid static damage.
Conclusion:
Fixing the VGA light on your motherboard involves several steps: reseat the graphics card, check power connections, update BIOS, ensure proper cable connections, test with another monitor or GPU, and update drivers. By systematically addressing these areas, you can identify and resolve the issue, restoring your computer’s video output functionality.
FAQs
What does the VGA light on my motherboard mean?
The VGA light indicates a problem with your graphics card or video output, preventing your computer from displaying anything on the monitor.
How do I check if my graphics card is seated correctly?
Power off your computer, open the case, and ensure the graphics card is firmly seated in its PCIe slot.
Can a loose cable cause the VGA light to stay on?
Yes, a loose or faulty video cable can disrupt the connection between the graphics card and monitor, triggering the VGA light.
Why should I update my BIOS to fix the VGA light?
Updating the BIOS can resolve compatibility issues and improve communication between the motherboard and the graphics card.
What should I do if reseating the graphics card doesn’t fix the VGA light?
Check the power connections to the graphics card and ensure all cables are securely connected.
How can I test if my graphics card is faulty?
Test your graphics card in another working computer or try a different graphics card in your system.
Is it necessary to check the monitor settings if the VGA light is on?
Yes, make sure the monitor is set to the correct input source and that the video cable is properly connected.
Can outdated graphics drivers cause the VGA light to turn on?
Yes, outdated or corrupt drivers can prevent the graphics card from functioning correctly, triggering the VGA light.
What role does the power supply play in the VGA light issue?
An inadequate power supply can cause the graphics card to malfunction, leading to the VGA light being lit.
Should I reset my BIOS settings to fix the VGA light?
Resetting BIOS settings to default can help resolve configuration issues that might be causing the VGA light to stay on.


